
|

|

|

|
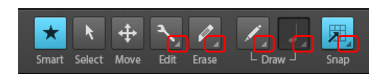
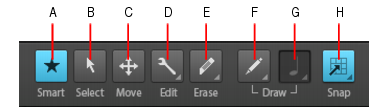
A. Smart tool B. Select tool C. Move tool D. Edit tools (Trim/Timing/Comping/Split) E. Draw tools (Freehand/Line/Sine/Triangle/Square/Saw/Random) F. Erase tools (Erase/Mute) G. Draw resolution H. Snap enable/disable

. The Smart tool is the default tool in Music Creator. The Smart tool is a multi-function tool that combines functions from several other tools. For audio clips, automation and transients, the Smart Tool is a combination of the Edit, Select and Move tools. For MIDI notes, the Smart Tool is a combination of the Edit, Select, Move, Draw and Erase Tools. The function is determined by where you click. For details, see Smart tool.
. The Select tool lets you select data. You can select a time range, or select entire clips, MIDI notes, envelope nodes and transients. For details, see Select tool.
. The Edit tool lets you adjust data. You can slip-edit clips, adjust note start/end times, adjust fades, raise/lower clip volume envelope, and raise/lower note velocity and automation envelopes. For details, see Edit tool.
. Select the Timing tool. The Timing tool lets you slip-stretch audio clips, drag-quantize MIDI notes, and stretch audio using transient markers. For details, see Timing tool.
. Select the Comping tool. The Comping tool lets you isolate clips in Take lanes. For details, see Comping tool.
. The Split tool lets you split clips, cut clips, split MIDI notes, split clips at transients, and add envelope nodes. For details, see Split tool.
. The Freehand tool lets you draw MIDI notes and freehand automation envelopes. You can also create and promote transient markers. For details, see Freehand tool.
. The Pattern tool lets you select MIDI data, and “paint” it elsewhere in your projects as if it were a brush. For details, see Pattern tool.
. The Triangle Pattern tool lets you edit automation envelopes by drawing triangle shapes. For details, see Triangle tool.
. The Square Pattern tool lets you edit automation envelopes by drawing square shapes. For details, see Square tool.
. The Random Pattern tool lets you edit automation envelopes by drawing random shapes. For details, see Random tool.
. The Erase tool lets you delete clips, partial clips, MIDI notes, automation envelope nodes, and transient markers. For details, see Erase tool.
. The note duration that is used when drawing new Note events with the Smart tool or Freehand tool. Click the button and keep the mouse button pressed for a brief moment to access the note value menu. For details, see Specifying note durations.
. Enable/disable snapping. When enabled, vertical grid lines that correspond to the snap resolution are displayed in the Track view. Right-click the button, or click and keep the mouse button pressed for a brief moment to open the Snap to Grid menu, which contains the following options:
. When Smart Grid is selected (the Snap to Grid button changes to
), the snap resolution is dynamically determined by the horizontal zoom level, and the M:B:T time rulers in the Clips pane and Piano Roll view are optimized to show relevant snap locations.
Tip - Searching Documentation
Tip: To search for a specific topic, type your search query in the Search Cakewalk.com field at the top right of this page.
When the search results appear, click which product's documentation you would like to search to filter the search results further.
Note - Using Offline Help
Note: If you prefer to always use offline Help, go to Edit > Preferences > File > Advanced in your Cakewalk software and select Always Use Offline Help.
If you are not connected to the internet, your Cakewalk software will default to showing offline help until an internet connection becomes available.